Saturday, December 22, 2012

Pine Cone Wreath

I remember making pine cone wreaths with my family as a kid.  There was a wire wreath frame that we wired the cones onto.  The frames have changed somewhat, but the principle is the same.  You used to be able to stuff the cigar shaped cones into the frame between the two layers but there's not enough room now.  Now, you have to wire them all on.  Well, the use of a hot glue gun is also an acceptable alternative.
You can see in this picture of the wreath frame that you couldn't get a fat pine cone stuffed in there. They're nearly flat now.  Break out the wires.  I I don't think that hot glue would be very effective with the pine cones yet.  They needed a base to be glued to.   
I've been collecting seed pods and pine cones for a while now.  Then, I went to Florida where I fell in love with the pine needles on the ground in my daughter's yard.  They look like they would be pine cones, but they are actually the needles!  They're about a foot long but as big around as my pinky!  I threw some in a bag and kept them in the freezer for the week that I was down there to make sure they had no bugs in them.
Here's how I made my wreath:  I took the pine needles and splayed them around the wire wreath frame that I bought at JoAnn's Fabric & Crafts store, wiring them down with some fine wire.  Perhaps I could have stuck them into the frame, but I didn't think about that till later.  I wired them atop the frame.  Then, I got out the cigar shaped Norway Spruce cones and wrapped wire around them to attach them to the wreath frame as well.  I found these in a cemetery.  Cemeteries are the best place to find cones.  I love to wander in a cemetery to gather cones.  It's such a peaceful place to be.  Of course, if you live by a state park or something, that may be your best place to look.  You can probably get them on line too. 
Once the Norway Spruce cones were down, I felt that I could hot glue on the smaller, round cones.  These were found in a different cemetery.  My Mom is great.  She knows the different types of pine cones and where to find them.  She's had a while to scope them out since she's lived in the area for 93 years now.  
I went all the way around adding the round cones before I glued on the little bitty cones that came from a tree in my sister's driveway.  It was one of those adorable little live Christmas trees that was planted beside the driveway.  Now, the tree is so huge that the driveway has to curve around it!  It's a beautiful tree with zillions of bitsy cones.
Now, we come down to the whole reason that I decided to make a pine cone wreath this year!  I know.  I tell you the reason after telling you the story.  It must be a writer's trick to keep you in suspense or perhaps to drive you nuts.  You pick.  My yard is surrounded by Beech trees and Oaks.  The beech nuts fell on my deck all summer, prickly, nasty little things that stuck in my poor cat's tail.  I gathered them up, thinking how wonderful they would look on a pine cone wreath.  Hmm.  Maybe not so much.  they're the prickly looking things on there.  I gathered some acorns at the last minute to finish it up.  The acorns look better than the beech nut shells.  The beech nuts and acorns were hot glued on last of all though I may yet add some seed pods from a Rose of Sharon bush.  We'll see.
When, I got out my Christmas decorations, I  found a small set of battery operated Christmas lights.  I stuck them through from behind.  I tried wiring the box with the batteries in an inconspicuous spot but it ended up falling out from where I had wired it.  It still didn't show, so I left it.  It will probably fall, pulling all of the lights out.  We'll see.  Actually, I just pulled them out in the end.
So, there you have it.  I made a pine cone wreath reminiscent of my childhood wreaths and I'm really happy with how it came out. 
I put white fluffy garland on the railings by my front stoop.  I have a sack full of white bows from someone's wedding.  I added a bow to the wreath.  What do you think - bow or no bow?   Hmmm. I guess, since you can't really SEE the bow, it doesn't particularly matter.  Eh?  A colored bow might be better, but since I don't feel like going out in the cold right now, it can wait.  I'll work on that next year.   
Folk had a hard time believing that the long floppy 'cones' could actually be the pine needles so I have posted these pictures to show them off.  Thanks to my dear daughter, Cyn, for taking the pictures of the tree in her yard.  

See?


Wednesday, November 14, 2012

New in blue

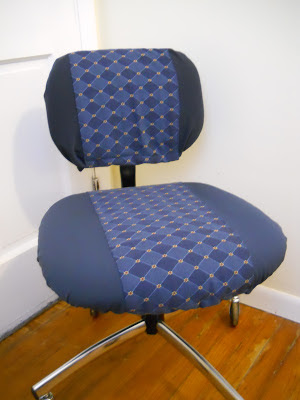
I decided that I really didn't like how my orange computer chair looked in my apartment.  My sister, Barb had made a cover for it that was green and blue.  It would have looked good elsewhere, but I just wasn't crazy about how it went with my sofa.  I had bought a remnant of a home dec fabric that I really liked.  It's red white and blue daisies in a diamond pattern.  I didn't realize how tiny the remnant was when I bought it.  It wasn't going to cover the whole chair.  How sad.
Well, I decided that I still wanted to use it, so I opted for a racing stripe over a base of stretch denim.
I made a basic pillow case for the back of the chair.  It didn't quite fit, so I turned it inside out and put it on again.  I pinned the heck out of it and sewed it again.  Ahh.  That's much better.  I put the stripe on after I had the shape down.  I strung some twine through the hem on the bottom and pulled it tight.
The seat cover is basically just a big circle.  I cut a rectangle and rounded the corners.  I folded under the edge, then folded it under again, to hide the ragged edges.  Once I stitched down my hem, I put the stripe on again, folding under the edges and stitching it on.  Again I threaded some twine through my hem by tying it onto a large paper clip and sliding it through.  I put it on the seat and pulled it taut.  I absolutely love how it looks next to my sofa!

What do you think?

Thursday, October 11, 2012

Wow! I haven't posted a new blog since June!

Wow!  I haven't posted a new blog since June!  
This is an effort to change that trend.  
Tomorrow night we expect our first frost.  It's sad that the summer is over.  Fall is here.  It's time to bring in the potted plants.  One of my potted plants is VERY big.  It was big when I put it out and then it grew.  I think it grew almost three feet, near to a meter.  It's a hibiscus bush.  It didn't flower at all this summer.  Just like the tomato plants, it didn't get enough sun.  My lovely porch is just too shady.  Oh well.  Live and learn.
It stood as tall as me so I borrowed a set of clippers and I trimmed it.  Now, if it had been in Panama, my gardener would have cut it down at least twice as far as I cut it tonight.  Maybe it doesn't make much sense to keep a flowering plant that doesn't flower.  Hey!  It's still a lovely plant!  Would I love my mother any less if she had been sterile?  Well, technically, yes.  I say this only because I would not be writing this blog if my mother had been sterile!  I wouldn't be alive!  Enough fertility humor.
I've already mentioned my tomatoes.  I did get two tomatoes.  They both rotted on the vine.  Oh well.  I have some ADORABLE carrots!  I need to bring in my carrots, my radishes, my beets and my spices.  I still have some geraniums and an impatience plant to bring in.  Where I'm going to put them all is uncertain.

Tuesday, June 12, 2012

53 Before 54


My niece’s birthday is in January and she posted a list on her blog of 27 things to do before she turned 28.  Me, being a lover of lists and goals, I decided that I should make a list as well.  Of course, MY birthday is in June, so my 53 things before 54 were a bit more challenging because I only had five whole months to work on them!
I was able to accomplish 18 out of 53 which is only about one third. Well, I just had that birthday, so I started a new list for the coming year.   With twelve months to work on my list, that means that I only have to finish four and a half goals per month.  That’s about one per week!  That seems doable, right?

 
53 Before 54


1) Finish Unpacking                                            28) Organize Craft Supplies
3) Sew Fluffies                                                      29) Go Yard Saling
3) Finish Round About                                      30) Go to the temple monthly
4) Gray collar on coat                                          31) Start a garden
5) Tie a fleece blanket                                        32) Make Jean Leg baskets
6) Find TV remote                                              33) Create body for fairy
7) Start Blog & post often                              34) Finish D’s Santa
8) Clear off table                                                  35) ComputerJournal                    
9) Write Worlds & Beings                                36) New phone contract
10) Index 1000 names                                         37) Keep weight below 150
11) Make Valentine Pillow                                 38) Finish & mail daffy pillow
12) Practice Guitar weekly                                39) Read all R.S. lessons
13) Find Battery Charger                                40) Make & send Valentines
14) Write New Song                                          41) Sew sock bunnies
15) Snowman Pillow                                              42) Go on a trip
16) Hats for sale                                                    43) Start a business
17) Read 6 books                                                 44) Photography course
18) Go to Marion Gunn Park                          45) Early birthday gifts
19) Become a temple worker                             46) Make a new friend
20) Have 10 blog readers                                   47) Make graduated presser
21) Bug Quilt                                                         48) Have a sleep over party
22) Start New Job                                               49) Photo Shop a quote
23) Read through Mosiah                                   50) Cut off dyed hair
24) Do Visiting Teaching                                   51) Walk in the rain
25) Sew Pink Quilt for baby                              52) Make May Day baskets
26) Teach RS Lesson                                         53) Start a composter
      27) Have a calling                                                     54) June 10, 2012

#11 Make a Velentine Pillow

#5 Tied Fleece Blanket
#31 Start a Garden (Vegie Container Garden)


#31 Start a Garden (flower garden)


Saturday, June 2, 2012

Misty's Adventures


I love my little apartment out in the woods. . . mostly.  I love the quiet of the evening, the cool shady surroundings, the drive up the road and even the tiny space that is mine.  When I rented it, I had no idea that I also held a garage sized storage space in the basement.  Of course, the probability of mice down there is pretty high, so I don’t dare to take anything down that’s not in a plastic tub.  I’ve seen my Mom’s yarn where the ‘cute little things’ made a nasty nest.  Hence, I keep most of my craft supplies upstairs.  I guess that I’m going to have to be strong and take some of it down.  Surely, I must. 
Misty by the door
Misty stalking a chipmunk
I love the view out my back door.  It’s a sliding glass door that leads out onto a small wooden deck.  Of course, it’s so surrounded by trees that not a whole lot of light gets in once the leaves come back.  My back porch is littered with beech nut husks too.  They’re a bugger to step on bare footed!  I’ve been collecting them for crafting though.  I think they would make a very nice touch on a pine cone wreath.  I’ll have to make one and show you what I mean.  Of course, the time for making pine cone wreathes is farther along in the year, when ripe cones fall.
Beech nut husks
My cat, Misty loves to go out in the morning to do her thing and then, sit on the deck, watching squirrels.  It’s been rainy quite a bit of late.  I hate to leave her out if it’s going to start raining.  I hate even more (at 6 in the morning) the feeling that I have to wait around for her to decide to come in again!  I hit upon a plan the other day.
When I first moved in, I found a stick that fit really nicely in the unmovable side of the sliding glass door.  It’s about the size of a yard stick but it is very rough and has a lovely rusty nail sticking up out of it.  I left the nail in it because it works very nicely as a handle to pick it up with, should I want to open the door and go out.  With the stick in the door, it opened about two inches so I took a steak knife to my stick and made it so that the door would open about four inches.  It’s wide enough for the cat to come in and out but I don’t think that it’s wide enough to get anything out.  It’s conceivable that you could pull my flat screen tv out, but since I only planned to leave it open if I was home, I didn’t see much problem with that.  All was well in my happy home in the woods.
Misty hunting the chipmunk that is ten feet up the tree
Misty woke me up at the crack of dawn one day last week, so I let her out while I used the facilities.  (This way she wouldn’t know that I was occupying her spot as I think the thought bothers her.)  She wouldn’t come right back in, so I went back to bed, leaving the door open four inches so she could come in when she was ready.  It was probably about two hours later that I was again awakened by the cat.  She was running around the living room like a wild thing.  When I went out to see what was up, she was obviously stalking something.  Now, when your cat is stalking something in the living room, that’s surely not a good sign.  I saw a little brown nose and thought it was a mouse.  It turned out to be a chipmunk!  FUN!  She eventually chased it over by the front door and I let it out.  I don’t think that she was happy with me for letting her toy escape.  Do I care?  Do you think that I’m going to care enough in the morning to leave the door open so she can come back in?  I have my doubts.  She will have to wait until I’m ready to get up.  And no, she will not be allowed to bring her toys in any more.  Poor kitty!

Wednesday, May 16, 2012

Dahlia Pillow


I saw a cool pillow on Pinterest one day.  It had a flower on it that reminded me of a Dahlia, very pretty.  It was, however, a square pillow and it seemed to me that it would look better as a round pillow.
I haven’t blogged in a while (no reason really) so I decided to post a tutorial on making a round Dahlia pillow. 
I happen to have many pieces of fleece, including one in the color which I was hoping to make my pillow, so I made my pillow out of fleece.  I think it worked very well so I could suggest that yours might also be out of fleece, but it doesn’t need to be.  You would want it to be of a fabric that isn’t going to fray though,  Perhaps a knit would work.  I’d bet it would look nice in a satiny fabric too, but there you would have your fraying factor so maybe not.
I chose out two colors of the fleece, in varying shades of maroon.
Of the darker of the two, I cut two circles, about sixteen  inches across.  I’m going to tell you the EASY way to do this, not the way that I did it.  You’ll want to sew your petals onto one circle before sewing them together and then stuffing it.  I had to sew it all by hand which was not easy without a curved needle.  You, however, should be able to do this on your machine, making it much easier and quicker.  Of course, the pictures that I have show the rows going onto a stuffed pillow.  This should help you to visualize how cool it’s going to look in the end.  If you want to do it the way that I did, go for it.  It was a nice project to do while watching tv at night.
pillow form
I did all kinds of crazy math with a tape measure and a paper and pencil, trying to figure out what size to cut my petals but ended up deciding that since I was going to gather the petals, I could make them any size I wanted and I really wanted to make them four and a half inches across!  Now, don’t go cutting out a million 4.5” flower petals just yet!  I measured round the edge and came up with somewhere around 40” so I thought that would be about ten petals around.  It ended up being 19!  I used the wrapper from a JoAnn’s fabric remnant to make a pattern for my flower petals.  (that’s 3” across for those who don’t have JoAnn’s remnants lying around all over) It was a wonderful width and I could get several petals from one wrapper.  I later used a Big Lots receipt which worked just as well, if not better.  I would suggest you find a cup that’s about 4” across and trace that onto your paper for the top curve, leaving the bottom flat.  Lay your two colors one on top of the other and Pin your 4” arc patterns on in a row from selvage to selvage leaving ½” between them. (You were wondering where I’d lost my half inch.  Weren’t you?) 
Pin well, sew around patterns
 Use at least two pins, maybe even three so it stays put while you sew around the curved edge of the pattern, leaving the flat side open.  At first, I was cutting them apart and pinning and sewing them onto the pillow separately.  WAS I CRAZY?  (okay –  best we don’t get into that right now) Sew around your patterns, back tracking at the start and finish (forward and back a bit) to keep the ends from coming undone when turned.  If you run out of patterns, you can always sneak the first few off and use them again.   Once you have a whole row sewn, cut them out, leaving a quarter inch seam allowance or so on each one.  Don’t cut them completely apart though!  Leave about a quarter inch uncut down by the flat side. 
Don't cut all the way through.
You would think that it would make it hard to turn them and they’d make a mess of things, but it actually made it easier to put them on the pillow!  Toward the end, I wasn’t really even pinning them anymore!  But I’m getting ahead of myself again.  Sorry.
One petal turned
One petal pinned
Once I had them sewed and cut out, I kind of pleated or gathered each flat side and pinned it with two pins.  I took about five hand stitches across the bottom of each petal.  Pinning them in a circle around the outer edge (at least two inches in from the edge of course)  and sewing them by machine should be so much easier.  I’m so jealous of you!  Once I had finished the first row, I wanted my petals to be a bit smaller so I took all of my patterns and trimmed them to be about a quarter to a half of an inch smaller.  They were all still the same size as each other and I still placed them on the fabric a half of an inch apart so that they would have their seam allowance.  Now, however, the bottoms were not flat, but with random points.  They really don’t matter so I didn’t bother to chop them off.  The next row of petals covers them.  Pin your second row about one and a half inches in from the last row, covering the flat ends.
First row & start of second
Third row
Keep adding petals
Sew, trim, turn, pin, sew to pillow.  Sew, trim, turn, pin, sew to pillow as many times as it takes to fill your pillow top.
My rows had 19 petals, 20 petals, (WHAT?) 13 petals, 9 petals and 5 petals.The center of the flower looked a little funky so I made a center pom pom sort of thing by wrapping two strips of fleece together in a jelly roll and snipping it every quarter inch or so.  I like it better now.
Add petals till there's no more room!
Sew around the two circles, leaving about three inches open to turn it right side out.  This step may be more difficult for you, since you have to pin the petals back so you avoid catching them in your seam.  Turning it with all of those pins in there may be challenging as well so maybe you should use safety pins for this step! I stuffed it with polyester fiber filler, not overly firm. Now, turn and pin and sew the opening closed.
I added a pompom center.
It looks great on my sofa!


I hope you love your Dahlia pillow as much as I love mine!

Monday, May 14, 2012

It's ten o'clock.


I remember as a kid hearing this message each night on tv:

It’s ten o’clock. 
Do you know where your children are?

We used to laugh.  That was such a funny thing to say.
When I moved away from Connecticut, with my husband being in the military, I just don’t remember ever hearing that announcement again. 
Tonight, I was going to change the channel to watch one more show before bed when the announcement came through.

It’s ten o’clock. 
Do you know where your children are?

My kids all live in Florida and I live in Connecticut now.
Is it because yesterday was Mother’s Day that it hit me so hard tonight?  I don’t know. 

It’s ten o’clock. 
Do you know where your children are?

I started to cry, uncontrollably.  I miss my kids so much!

Thursday, February 23, 2012

A Felted Bird's Nest


Having bought a wreath last fall, I decided that in order to be perfect, it needed a little bird’s nest.  I remembered having seen a tutorial on a blog and I hunted and hunted for it, to no avail.  All I could remember was: Cut the sleeve off of a wool sweater.  Do some stitches with random NON-wool yarns.  Stitch around both ends.  Tuck the ends in and pull the stitches to tighten.  Then, wash in hot water to felt (shrink and tighten) the wool.

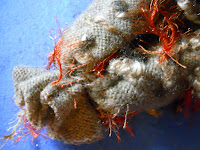
So, that’s what I did.  I whacked the sleeve off of an old wool sweater that I bought at a sale at the Salvation Army.  I made random stitches here and there with three different types of acrylic yarn in natural colors.  There was a lot of orange in one of the yarns.  I didn't like it so I tied it in a knot on the back side each time that color came up. I stitched around the ends with a strong thread and pulled the first end tight..  I tucked both ends to the inside and pulled the other end tight.  Using a needle, I tucked the threads to the inside before washing the whole thing in hot water.   


This is the first item that I have purposefully felted.  It didn’t shrink much.  My Mom convinced me to put it in boiling water and then in cold.  I stirred it with a plastic spoon and squeezed it out inside a wash cloth.  Then, Mom took it to her house to throw it in the clothes dryer.  It still didn't really shrink.  I think maybe the sweater was already felted!  Oh well.  It looks really cute in my wreath.  I love it! 

Thursday, February 16, 2012

Cowly Coolness


I made myself a very cool . . . what is it?  It’s a hat.  It’s a scarf, a cowl?  It can also be a shrug!  A friend asked me to make a tutorial.  That sounded like fun, so here it is! 
I went to JoAnn’s looking for a half yard of fleece and 1 and 2/3 yards of a coordinating brocade.  I bought a remnant of black fleece.  I had decided that I needed a black hat anyway.  The remnant had to be at least 18” long to be big enough.  That’s ½ yard if you just go to the cutting counter and ask for it. (say they didn’t have a color you like or something)  Getting the remnant is more economical though.  I am so cheap!  A half yard of the fleece will work since it’s so wide.  It’s almost 60” once you cut off the selvage edge where it’s kinda funky.  My remnant was a few inches too big so I cut it down to 18” across.  
A remnant of brocade won’t work, since a remnant is a left over bit (usually less than a yard) and you need a yard and 2/3.  I found mine in the red tag fabrics in back. (again, cheap) Cut your piece 21” wide
 Now, make sure that the two pieces are the same length.  Sew the short ends of each piece together to make two loops. Because a brocade tends to fray easily, I also zig zagged the seam on the brocade. Press the edge of the brocade loop to the inside,(the wrong side of the fabric)about ½” using a cool iron.  (my iron is so cool, eh?)  No.  I'm saying don't melt it by going hot!


Lay the wider, brocade fabric loop inside the narrower, fleece loop with the wrong sides facing each other and seams separated by about an inch.  Fold the brocade over again and pin it to the fleece on both sides.  Sew around both sides.  Clip the threads and you’re done!  See how easy that was?  You can slip it over your shoulders like a shrug (I'm not crazy about the look) or wrap it around your neck, twist it in the front and then slide the second loop over your head.
I hope you love it as much as I love mine!